Skip to content

Where different views on Israel and Judaism are welcome.

  • Home
  • Subscribe / donate
  • Events calendar
  • News
    • Local
    • National
    • Israel
    • World
    • עניין בחדשות
      A roundup of news in Canada and further afield, in Hebrew.
  • Opinion
    • From the JI
    • Op-Ed
  • Arts & Culture
    • Performing Arts
    • Music
    • Books
    • Visual Arts
    • TV & Film
  • Life
    • Celebrating the Holidays
    • Travel
    • The Daily Snooze
      Cartoons by Jacob Samuel
    • Mystery Photo
      Help the JI and JMABC fill in the gaps in our archives.
  • Community Links
    • Organizations, Etc.
    • Other News Sources & Blogs
    • Business Directory
  • FAQ
  • JI Chai Celebration
  • [email protected]! video

Search

Archives

Recent Posts

  • Celebrating 25 years
  • “Never again” still resonates?
  • Every person has a voice
  • The kill fee – and its fallout
  • Investing in the climate
  • Shalhevet honours Vivian Claman
  • Health workers’ courage
  • A grandfather’s story – available online to May 7
  • SFU students vote BDS
  • With a Song returns to forum
  • StandWithUs Canada course
  • Chance to meet local artists
  • Mixing global music, dance
  • Our relationship to objects
  • Orcas inspire creative music
  • A full life post-career
  • Mausoleum work to resume
  • רכישות צבאיות על ידי ממשלת קנדה
  • Helping Ukrainian refugees
  • The scarcity of water
  • Celebrate Israel with joy
  • Happy 74th birthday, Israel!
  • Fundraiser for Ukraine
  • A celebration of dance
  • 25 years since deadly crash
  • Art Vancouver fair returns
  • Presenting Mixed Repertoire
  • Fostering literacy, education
  • BGU tackles climate change
  • Revitalizing community
  • Angels still giving
  • Community milestones … Federation campaign success & Hebrew U donation
  • Immigration challenges
  • A religious pilgrimage

Recent Tweets

Tweets by @JewishIndie

Byline: Lana Lagoonca

Make a butterfly for spring

Make a butterfly for spring

Spring is the time of nature’s reawakening, when we are treated to so many vibrant and beautiful colors and shades. Spring is also when Jewish communities around the world celebrate the unique and important holiday of Passover. So why don’t we combine the two and make a festive Passover postcard with a spring butterfly against flowery background?

In making our postcard, we can unleash our imaginations! There are so many beautiful butterflies in the world – it is impossible to count them all. And there are no strict rules in art projects, so feel free to be creative, dear young artists. But, if you want to try and make your butterfly look like a real one, you will need to choose a design you can repeat, as both wings of a butterfly are the same in design and texture.

So, gather all the brown, black, blue, yellow, purple, green, pink and other colors of Plasticine you have at home. You will also need toothpicks. Now let’s get started!

image - Passover postcard steps 1-4 by Lana Lagoonca
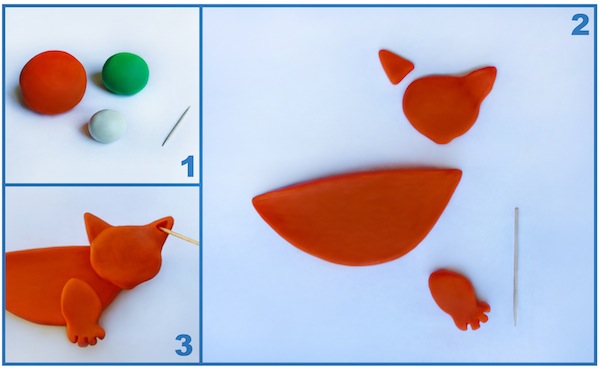
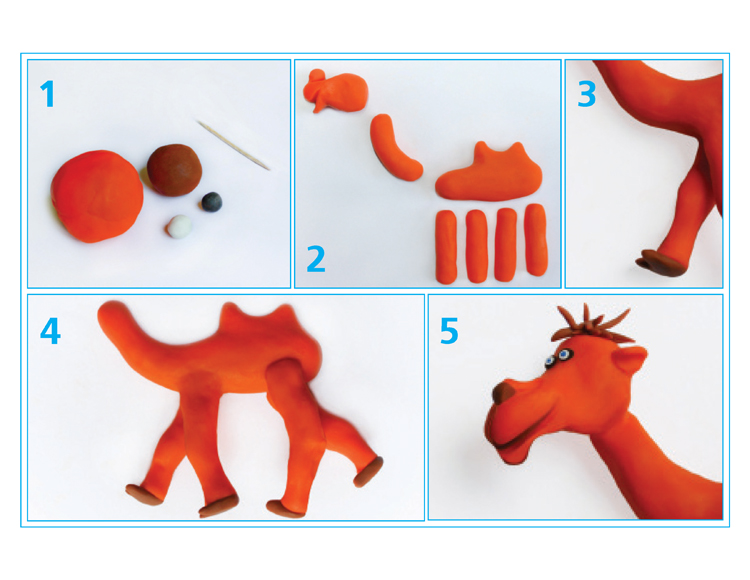
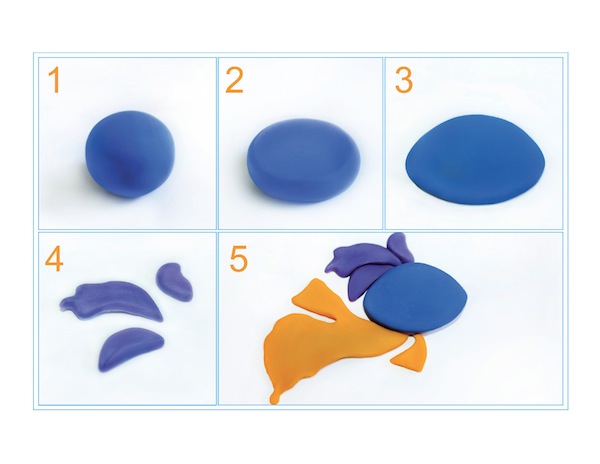
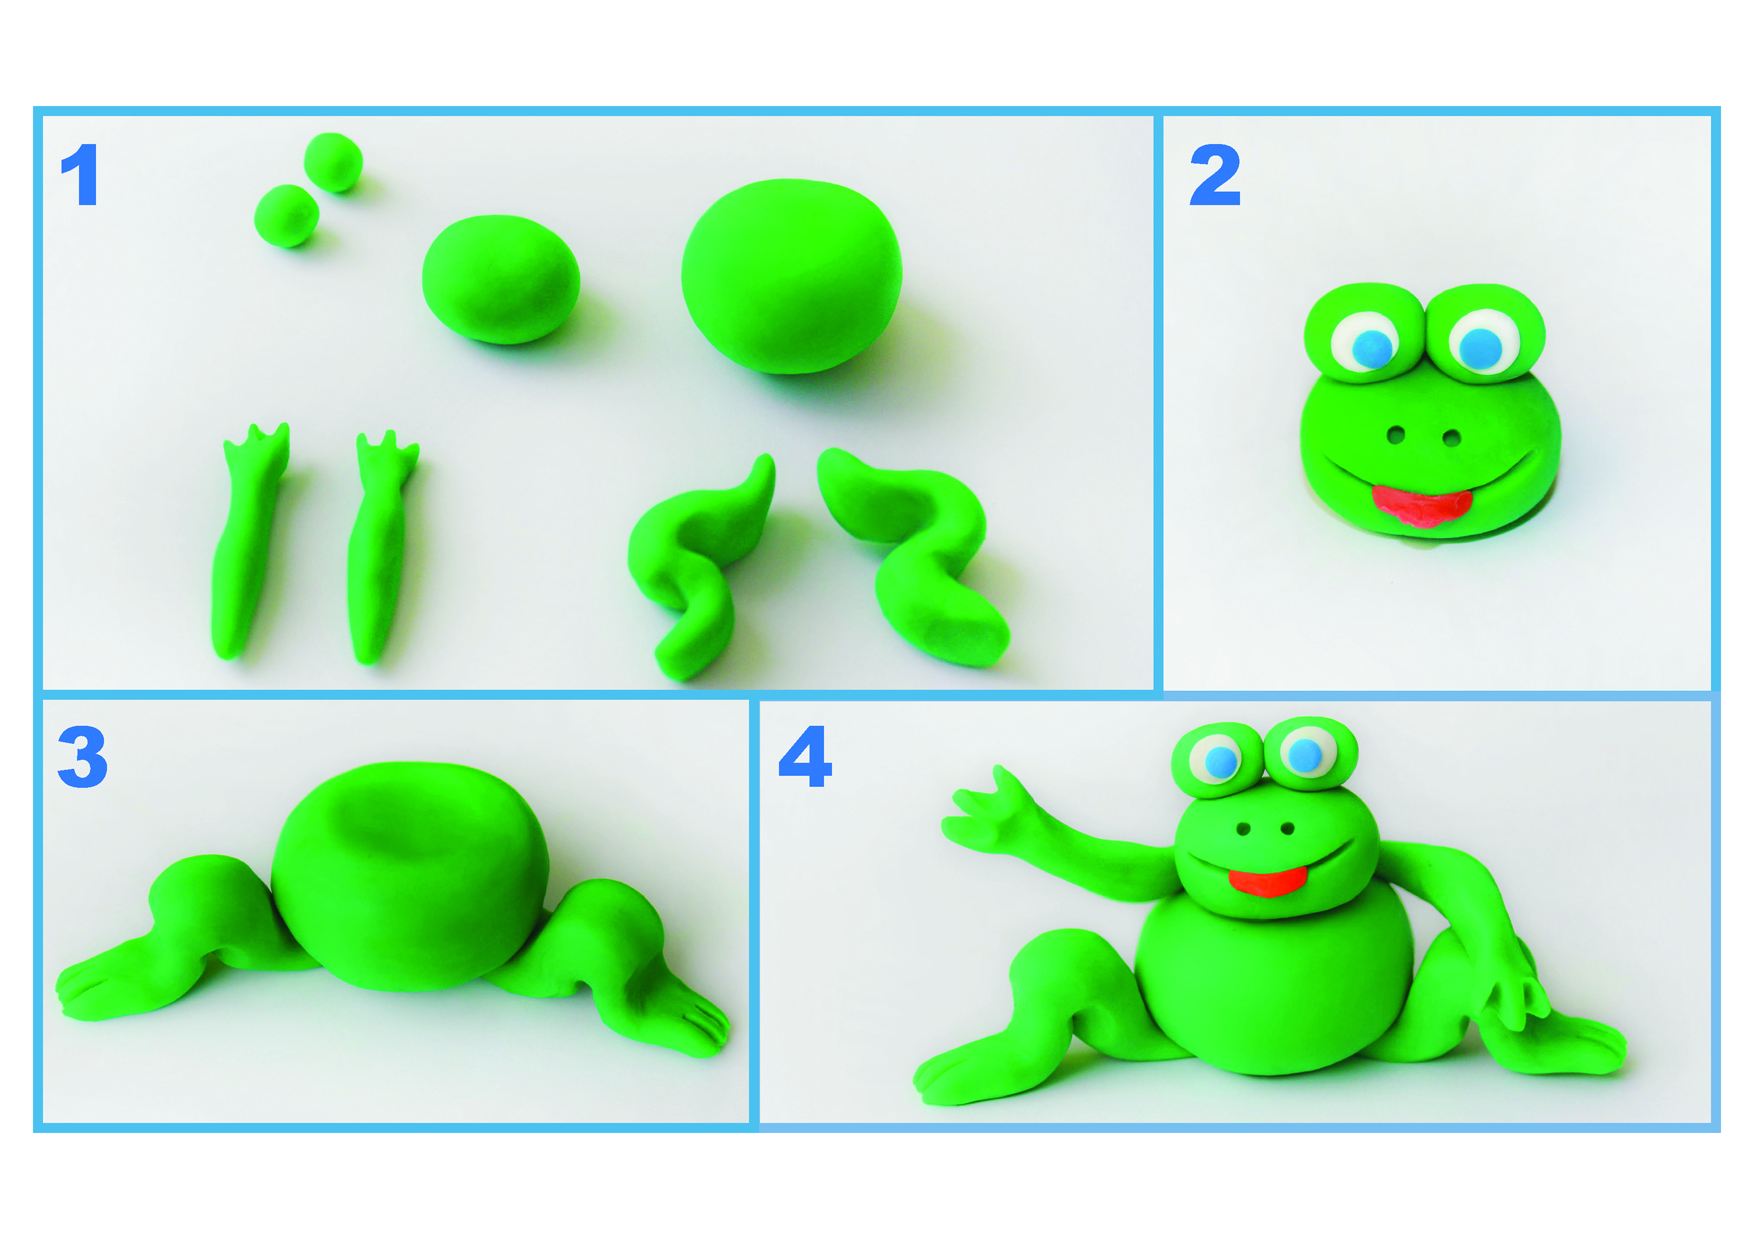
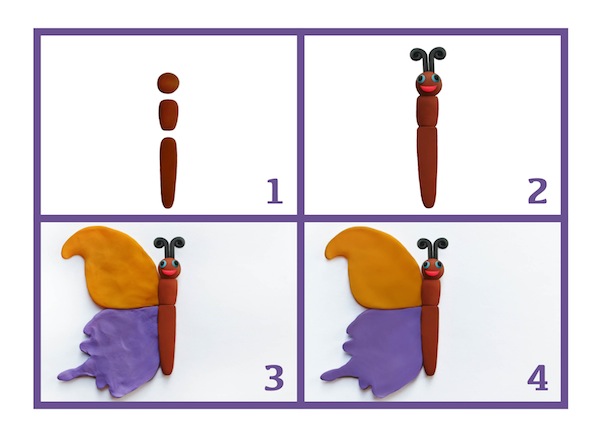
1. Take brown Plasticine and make the butterfly’s head, thorax (torso) and abdomen.

2. Put all the butterfly body parts together. Make black antennae (a butterfly’s “whiskers”). After that, make and attach blue eyes and a pink mouth.

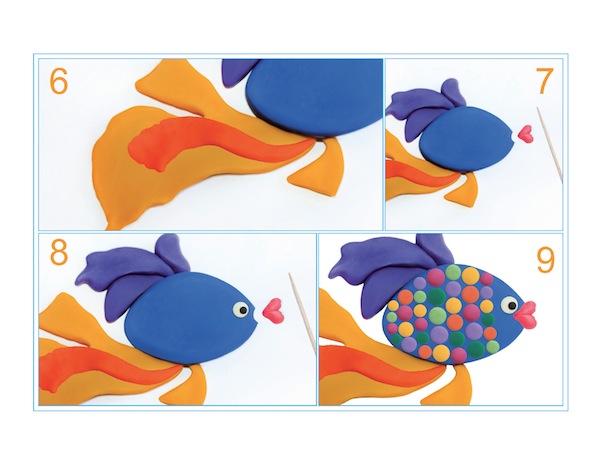
3. Take yellow Plasticine and make one wing, attach it to the body on the top left side. Make one more wing – purple – and attach it underneath the yellow wing.

4. Use your fingers to make the wings smooth.

image - Passover postcard steps 5-8 by Lana Lagoonca
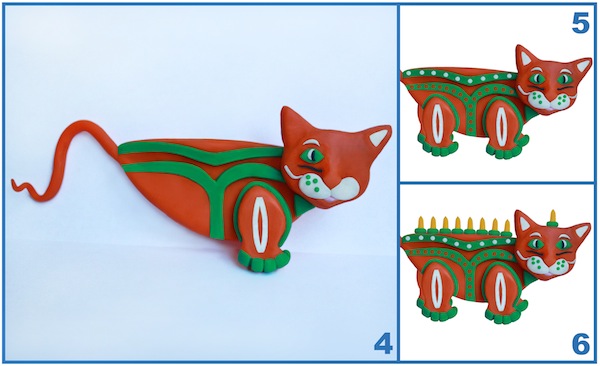
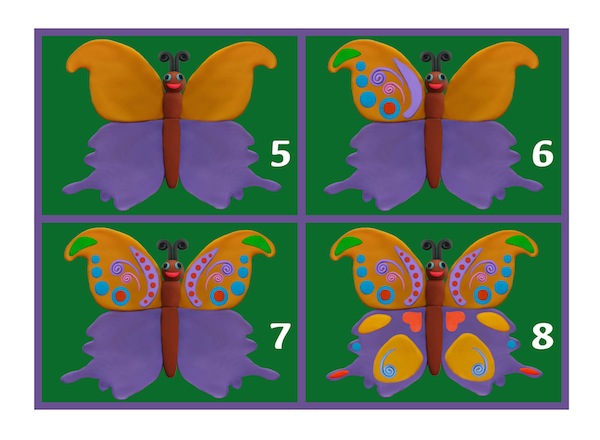
5. Now make and attach identical wings to the right top and bottom sides. Make them smooth, too.

6. Make beautiful ornaments for the top left yellow wing using, for example, green, blue, purple, red and pink colors, just like we did. You can use other colors, if you’d like.

7. Repeat the same design on the top right yellow wing.

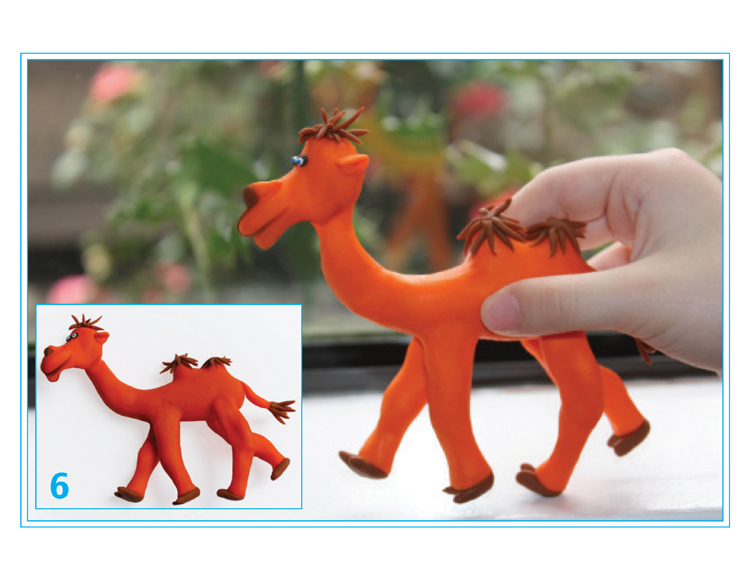
8. Using the same technique, make colorful ornaments for the two bottom wings on both sides. You may use yellow, orange and blue colors to do that. Now your butterfly is ready!

To make the postcard, you can put your butterfly in front of some flowers, attaching it using a piece of wire or a thin stick, and take a picture of it with this flowery background. You can then print out the image, and you will have your own beautiful Passover postcard with a fluttering butterfly.

Happy Passover, dear Jewish Independent readers – to you and your families!

Lana Lagoonca is a graphic designer, author and illustrator (lunart.ca). At curlyorli.com, there are more free lessons, along with information about Curly Orli merchandise.

Posted on April 15, 2016April 13, 2016Author Lana LagooncaCategories Celebrating the HolidaysTags butterfly, Passover, Plasticine
How about a meowukiyah?

How about a meowukiyah?

During the Festival of Lights, Chanukah, we light up candles in a special candleholder called a chanukiyah. Chanukiyot come in all kinds of designs, shapes and colors. That is why we will make our own unique version. To be more specific, it is going to be a meowukiyah, since our chanukiyah will take a shape of a cat.

  1. To start, have ready a few basic colors of modeling clay: orange, green, black and white, and a little bit of pink. You will also need a toothpick.
  2. Take the orange modeling clay, make and set aside the body parts of the cat: a head, two ears, the trunk in a shape of a watermelon slice, and four legs.
  3. Attach the ears to the head, the head to the trunk and then attach all four legs to the body. Using the toothpick, carefully trace triangles inside the ears.
  4. image - meowukiyah steps 1-3Using white, green and black modeling clay, give your cat a face: make the eyes, the eyebrows, cheeks with whiskers – and don’t forget the pink mouth. Make green paw pads and decorate the pads just like the picture shows or the way you like it. After that, make a few green stripes and attach them to the top of the trunk. Give your cat a tail.
  5. Make few little balls from white and orange modeling clay. Using a little force, flatten them into the trunk of your cat. Alternatively, you can try your own design. Don’t be afraid to use your imagination!
  6. The only remaining task is to make the candles. The body of the cat can hold eight yellow candles in green candleholders, and the head can have the shamash, the candle that is used to light up all other candles.

meowukiyah steps 4-6Our meowukiyah is ready! You can play with it, just like you play with your toys, or you can use it to decorate your home. If you take a picture of your creation and print it out, it would make a wonderful Chanukah postcard. Send the pictures of your artwork to [email protected] and win prizes from Curly Orli.

Have a Happy Chanukah, dear Jewish Independent readers!

Lana Lagoonca is a graphic designer, author and illustrator (lunart.ca). At curlyorli.com, there are more free lessons, along with information about Curly Orli merchandise.


Format ImagePosted on December 4, 2015December 3, 2015Author Lana LagooncaCategories Celebrating the HolidaysTags Chanukah, meowukiyah, Plasticine
Make the New Year sweeter

Make the New Year sweeter

Apples and honey are essential at Rosh Hashana’s festive table. An old tradition of eating apples dipped in honey reflects our hopes for “sweet” and prosperous New Year. Shall we try and make this treat together?

image - 1. Take a toothpick and a few pieces of modeling clay (or Plasticine) in green, yellow, red and white colors. 2. Mix well a piece of green and a small amount of yellow modeling clay. Make a ball out of this mixture and, using the toothpick, make a hole in the bottom of the ball. 3. Next, you can make a stem for your apple by sticking a small brown piece of clay in the hole that you made. Your apple is ready! 4. Mix well a piece of red modeling clay and a small amount of yellow. Follow the procedure in Step 2 and make a red apple. Don’t forget about giving your apple a “tail” and a “nose” using brown clay. 5. It is time to make some apple slices. Take white modeling clay and mix it with yellow. Shape the mixture into a crescent. Make the skin of an apple from green modeling clay. 6. Combine the crescent shape with the skin and your apple slice is ready. Make a few such slices. 7. We still need to make a pot of honey. For that, we use brown and blue modeling clay. First, make a brown pot, and then add a blue rim to it. Also attach a little handle to the side of your pot. “Fill” your pot with honey by putting a little oval made from yellow modeling clay on top. 8. Now we only need to make a dipper. Take brown modeling clay and roll it into a stick shape. It has to be thinner on one end and wider on another, resembling a hammer. To create the illusion of carving, typical for a dipper, encircle the wide part of it with few horizontal stripes made from orange clay. Steps 1-41. Take a toothpick and a few pieces of modeling clay (or Plasticine) in green, yellow, red and white colors.

2. Mix well a piece of green and a small amount of yellow modeling clay. Make a ball out of this mixture and, using the toothpick, make a hole in the bottom of the ball.

3. Next, you can make a stem for your apple by sticking a small brown piece of clay in the hole that you made. Your apple is ready!

4. Mix well a piece of red modeling clay and a small amount of yellow. Follow the procedure in Step 2 and make a red apple. Don’t forget about giving your apple a “tail” and a “nose” using brown clay.

image - 1. Take a toothpick and a few pieces of modeling clay (or Plasticine) in green, yellow, red and white colors. 2. Mix well a piece of green and a small amount of yellow modeling clay. Make a ball out of this mixture and, using the toothpick, make a hole in the bottom of the ball. 3. Next, you can make a stem for your apple by sticking a small brown piece of clay in the hole that you made. Your apple is ready! 4. Mix well a piece of red modeling clay and a small amount of yellow. Follow the procedure in Step 2 and make a red apple. Don’t forget about giving your apple a “tail” and a “nose” using brown clay. 5. It is time to make some apple slices. Take white modeling clay and mix it with yellow. Shape the mixture into a crescent. Make the skin of an apple from green modeling clay. 6. Combine the crescent shape with the skin and your apple slice is ready. Make a few such slices. 7. We still need to make a pot of honey. For that, we use brown and blue modeling clay. First, make a brown pot, and then add a blue rim to it. Also attach a little handle to the side of your pot. “Fill” your pot with honey by putting a little oval made from yellow modeling clay on top. 8. Now we only need to make a dipper. Take brown modeling clay and roll it into a stick shape. It has to be thinner on one end and wider on another, resembling a hammer. To create the illusion of carving, typical for a dipper, encircle the wide part of it with few horizontal stripes made from orange clay. Steps 5-85. It is time to make some apple slices. Take white modeling clay and mix it with yellow. Shape the mixture into a crescent. Make the skin of an apple from green modeling clay.

6. Combine the crescent shape with the skin and your apple slice is ready. Make a few such slices.

7. We still need to make a pot of honey. For that, we use brown and blue modeling clay. First, make a brown pot, and then add a blue rim to it. Also attach a little handle to the side of your pot. “Fill” your pot with honey by putting a little oval made from yellow modeling clay on top.

8. Now we only need to make a dipper. Take brown modeling clay and roll it into a stick shape. It has to be thinner on one end and wider on another, resembling a hammer. To create the illusion of carving, typical for a dipper, encircle the wide part of it with few horizontal stripes made from orange clay.

Remember, you can use the toothpick to refine all your pieces of art. As well, before you start working with a new color, wipe your hands with a napkin to prevent the unwanted mixing of colors. And, most important of all – use your imagination! There are no strict rules when it comes to creativity. Don’t be afraid to experiment with colors.

Once you’ve finished your creations, if you put together all the pieces that you have made and take a picture, you will have a wonderful and unique Rosh Hashana greeting card.

Sweet and prosperous Rosh Hashana wishes to all the artists and all the Jewish Independent readers!

Lana Lagoonca is a graphic designer, author and illustrator. At curlyorli.com, there are more free lessons, along with information about Curly Orli merchandise.

Format ImagePosted on September 11, 2015September 9, 2015Author Lana LagooncaCategories Celebrating the HolidaysTags Curly Orli, Plasticine, Rosh Hashana
Create your own clay camel

Create your own clay camel

How fast time flies. Passover is almost here again, and it’s time to prepare a new tutorial, I said to my 7-year-old daughter while getting out a magic box with colorful modeling clay.

At school, we are reading a lot about Passover right now, she said to me. When the Jewish people crossed the dessert, they had camels with them, who carried people and their belongings. Mom, can you teach me how to model a baby camel? Please, mom, can you?

Of course I can, my dear. Come over here, I said, inviting my daughter to join me at the table to work on the model of a baby camel. For the young readers of Jewish Independent, as always, I have prepared pictures to demonstrate the process. Find yourself a comfortable seat and start working on your creation!

image - Clay camel by Lana Lagoonca, steps 1-51. Take a few pieces of modeling clay and a toothpick. Mostly we will work with orange color, but we will also use some brown, white and black pieces.

2. Prepare equal amounts of clay to form the baby camel’s head, neck, body with two humps and four legs.

3-4. Bend the legs a little in the middle and finish them with brown cushion-like hooves, perhaps parted in the middle front. Connect the neck, body and hooves.

5. For the head, you can use white and black pieces of clay for the eyes. Or blue or green clay, if you have it. Take some brown clay and shape the nose and also give your camel a tuft of hair on top of its head.

6. Cover the tips of the humps and tail with tufts of hair as well. We have made our baby camel! You can now take your new little friend for a walk.

image - Clay camel by Lana Lagoonca - taking it for a walkIsn’t it great to make toys with your own hands? You will also make your family happy by adding your creation to the Passover seder table. If you take a picture of your baby camel and print it, you will have a real postcard.

Let your imagination guide you and join our art lab! Send photos of your artwork to [email protected], and you may have a chance to win Curly Orli Goes to Vancouver, a book illustrated with clay pictures.

Wishing you a kosher and happy Pesach, dear friends! See you next time.

Lana Lagoonca is a graphic designer, author and illustrator. At curlyorli.com, there are more free lessons, along with information about Curly Orli merchandise.


Format ImagePosted on March 27, 2015March 26, 2015Author Lana LagooncaCategories Celebrating the HolidaysTags camel, Curly Orli, Passover, seder
Holiday treats to be beheld – not eaten!

Holiday treats to be beheld – not eaten!

The Holiday of Light, Chanukah is approaching fast. That is why Curly Orli and I are looking to prepare Chanukah cookies with you! However, we will not need eggs, flour or other ingredients for baking – instead, we will make them from Plasticine or Play Doh. Here’s how:

instructions on making Plasticine Chanukah cookies, by Lana Lagoonca1. We start by making three different shapes like in the first picture, using orange Plasticine: a chanukiyah (a candleholder with nine candles), a sevivon (dreidel) and a Star of David, or Magen David.

2. Using the Star of David shape, cover the surface of the cookie with a thin layer of blue Plasticine for icing.

3. Add thin stripes of white Plasticine to the cookie.

4. For the chanukiyah, add blue icing to the base, then add white Plasticine stripes around the shape of the base.

5-6. Using yellow Plasticine, make the chanukiyah’s main stand, then add four curved lines to both sides of the main stand. Make candles from small pieces of white Plasticine and, for the top of the candles, create flames by using red Plasticine.

7-9. In the same manner as with the Magen David and chanukiyah, add blue icing to the top of the sevivon cookie and then white lines. Also, let’s add the letters on the dreidel, a nun, gimmel, hay or shin, for Nes gadol hayah sham, A great miracle happened there.

Make a lot of cookies – but don’t eat them! Curly Orli and I hope that the cookies from this art project will help make your home even more festive.

Happy Chanukah to all the readers of the Jewish Independent!

Lana Lagoonca is a graphic designer, author and illustrator. At curlyorli.com, there are more free lessons, along with information about Curly Orli merchandise.


Format ImagePosted on December 12, 2014December 10, 2014Author Lana LagooncaCategories Celebrating the HolidaysTags Chanukah, Magen David, Plasticine, Play Doh, sevivon
Make a fish for Rosh Hashanah

Make a fish for Rosh Hashanah

Fish is a traditional part of the Rosh Hashanah meal. Since Rosh Hashanah translates literally as “Head of the Year,” some people will eat the head of a fish as part of the holiday meal, or at least have one on their holiday table. Fish is also a symbol of fertility and prosperity.

Today, we will make a beautiful fish from Plasticine. While you won’t be able to eat it, you can add it to the table with other symbols of the holiday.

For this art project, you will need various colors of Plasticine or Play Doh.

image - Plasticine fish steps 1-51. First, we make the body of the fish. Roll a small ball from blue Plasticine.

2. Flatten the ball with the palm of your hand and flip onto the other side.

3. With the tip of your fingers, gently raise the edges on both sides.

4. Now make a top fin. You will need three small pieces of dark blue or purple Plasticine. Using a toothpick, attach the top fin to the body of the fish.

5. Use yellow Plasticine to make a bottom fin.

image - Plasticine fish steps 6-96. Add an orange fin on top of the yellow one.

7. With the help of a toothpick, make an indent for the mouth. Later, using pink Plasticine, create heart-shaped lips. Attach the lips to the body.

8. Using white and black Plasticine assemble an eye, and add it to what you’ve already put together.

9. Our fish is almost ready! We just need to add scales. Make a small green ball and flatten it. Add this newly formed circle to the body. Now, create many of these circles and decorate your fish with beautiful and colorful scales.

Instead of circles, you may create stripes or any other unique designs – and, of course, you can use any colors you want for any part of your fish. Art is a soul’s expression. Imagine, inspire, innovate!

Happy New Year to all young readers and their parents! Curly Orli and I wish you a year full of happiness and joy!

Lana Lagoonca is a graphic designer, author and illustrator. At curlyorli.com, there are more free lessons, along with information about Curly Orli merchandise.

Format ImagePosted on September 19, 2014September 18, 2014Author Lana LagooncaCategories Celebrating the HolidaysTags Curly Orli, Plasticine, Play Doh, Rosh Hashanah
Springtime frogs for Pesach

Springtime frogs for Pesach

In anticipation of the Jewish holiday of Passover, Curly Orli and I are making cute froggies. It is true that frogs were one of the Ten Plagues, but frogs are also believed to be the bringers of spring! These days, they are happily hopping around in parks and forests after a long winter slumber. Now, you can have one of them at home … a Plasticine one, that is.

Steps 1-4 of making a Passover froggie.
Steps 1-4 of making a Passover Plasticine froggie.

1. Prepare green Plasticine. Separate it into pieces for different body parts: eyes, head, torso and two pairs of legs.

2. Using white and blue Plasticine, make eyes. With the help of a toothpick, make a nose by poking two holes, then a mouth and, finally, add a red tongue.

3. From earlier prepared pieces, let’s make a lower part of the body and legs. Attach them together.

4. Connect upper and lower body. The froggy is ready!!!

image - Steps 1-4 of making a Passover frog.
Steps 5-7: making a flower for our Passover Plasticine froggie.

5-6. Our froggy is festive and joyous, so let’s give him a beautiful flower. We can make petals from various small and round colorful Plasticine pieces by making them pointy at the end.

7. Let’s add petals to the flower and connect them to the stem.

8. Now, we will give this flower to the froggy. Our creation is complete.

Happy Passover to all the readers of the Jewish Independent! We wish you peace, joy and new creative adventures.

Lana Lagoonca is a graphic designer, author and illustrator. At curlyorli.com, you will find more free lessons, along with information about Curly Orli merchandise.

Format ImagePosted on April 11, 2014April 16, 2014Author Lana LagooncaCategories Celebrating the HolidaysTags Curly Orly, kids arts and craft, Plasticine
Proudly powered by WordPress