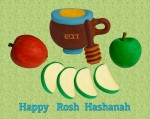
Apples and honey are essential at Rosh Hashana’s festive table. An old tradition of eating apples dipped in honey reflects our hopes for “sweet” and prosperous New Year. Shall we try and make this treat together?
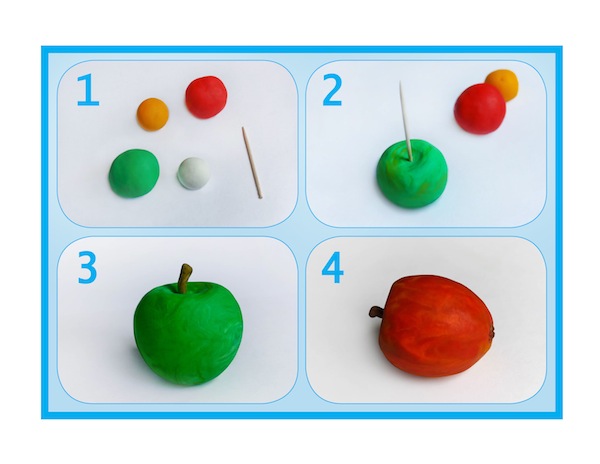 1. Take a toothpick and a few pieces of modeling clay (or Plasticine) in green, yellow, red and white colors.
2. Mix well a piece of green and a small amount of yellow modeling clay. Make a ball out of this mixture and, using the toothpick, make a hole in the bottom of the ball.
3. Next, you can make a stem for your apple by sticking a small brown piece of clay in the hole that you made. Your apple is ready!
4. Mix well a piece of red modeling clay and a small amount of yellow. Follow the procedure in Step 2 and make a red apple. Don’t forget about giving your apple a “tail” and a “nose” using brown clay.
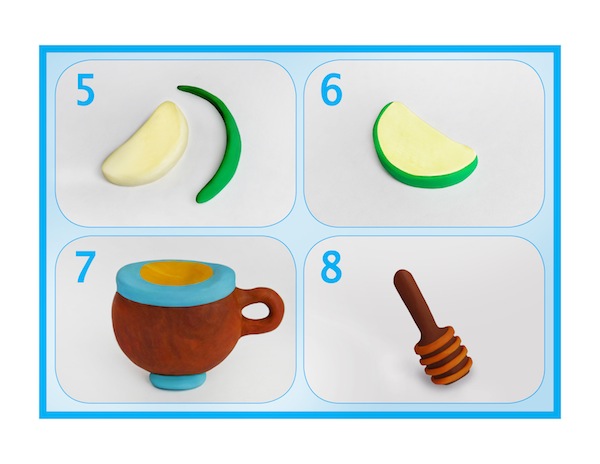 5. It is time to make some apple slices. Take white modeling clay and mix it with yellow. Shape the mixture into a crescent. Make the skin of an apple from green modeling clay.
6. Combine the crescent shape with the skin and your apple slice is ready. Make a few such slices.
7. We still need to make a pot of honey. For that, we use brown and blue modeling clay. First, make a brown pot, and then add a blue rim to it. Also attach a little handle to the side of your pot. “Fill” your pot with honey by putting a little oval made from yellow modeling clay on top.
8. Now we only need to make a dipper. Take brown modeling clay and roll it into a stick shape. It has to be thinner on one end and wider on another, resembling a hammer. To create the illusion of carving, typical for a dipper, encircle the wide part of it with few horizontal stripes made from orange clay.
Remember, you can use the toothpick to refine all your pieces of art. As well, before you start working with a new color, wipe your hands with a napkin to prevent the unwanted mixing of colors. And, most important of all – use your imagination! There are no strict rules when it comes to creativity. Don’t be afraid to experiment with colors.
Once you’ve finished your creations, if you put together all the pieces that you have made and take a picture, you will have a wonderful and unique Rosh Hashana greeting card.
Sweet and prosperous Rosh Hashana wishes to all the artists and all the Jewish Independent readers!
Lana Lagoonca is a graphic designer, author and illustrator. At curlyorli.com, there are more free lessons, along with information about Curly Orli merchandise.