Five summer “must haves”

Nozone Swimwear has a full range of cover-all swimsuits for kids. (photo from Nozone)

As summer begins to show its face in Vancouver, it’s time to replenish those supplies that keep us safe and entertained throughout the season. Here’s my list of five top “must haves” – or “would be really nice to haves” – for the sunny weather.

Skin-safe swimwear: Made on Vancouver Island, Nozone Swimwear has a full range of cover-all swimsuits for kids that look great, are comfortable to wear and protect that sun-sensitive skin from ultraviolet rays. Best of all, they last forever. My daughter’s, a hand-me-down that goes back at least eight years, is showing no signs of wear and tear and remains a go-to favorite. From $30, they’re available at nozoneclothing.com or from select Vancouver retailers, including Crocodile (2156 West 4th Ave.), Duck Feet (1447 Marine Dr., West Vancouver) and Splash Swim and Cruise (2950 West 4th Ave.).

Sunscreen sans grease: There’s nothing like that greasy feeling you get when you’ve smeared sunscreen all over your skin. Kiss My Face is a non-greasy alternative in an easy-spray container. It’s gluten free, paraben free, phthalate free and contains no artificial fragrance, which means you won’t smell like an overripe coconut once it’s on your skin. An eight-ounce spray bottle of SPF 30 sun spray lotion will set you back $16.49 online, at kissmyface.com.

No-leak goggles: If you love swimming but hate the effect of chlorine or saltwater on the naked eye, you’ll want to invest in a pair of AquaSphere goggles. The company offers a wide range of designs to fit the faces of women, men and kids. Most offer 180-degree visibility, easy and quick strap adjustments and a leak-resistant Silicone skirt that does not leave you with raccoon-like eyes after your swim. At $25-$30, they’re a little pricier than generic brands, but the extra price is worth it because the goggles last longer, are supremely comfortable on the eyes and – get this! – keep the water out of your eyes. There’s more information at aquasphereswim.com or stores specializing in outdoor recreation.

Ear protection: There’s nothing like the pit-of-the-stomach feeling you get when your kid announces painful ears. Swimmer’s ear claims many victims among children each summer and can be an extremely painful affliction, particularly when it occurs over the weekend when, inevitably, doctors’ offices are closed and hospital ER rooms are packed. If your kids are remotely prone to swimmer’s ear, consider investing in AquaEars: soft silicone, latex-free earplugs that are moldable to any size ear and appropriate for kids age three and up. They’re available in designs that include Hello Kitty, SpongeBob, Disney Cars and LittleMermaid. At cirrushealthcare.com, it’s $5.99 for a three-pair pack.

Homemade popsicles: In my house, I can’t keep up with the demand for popsicles, since every time it’s sunny, someone gleefully declares, “Popsicle weather!” and heads to the freezer. The Zoku Quick Pop Maker is a great alternative to store-bought popsicles. The device has a compact base that gets stored in the freezer when it’s not being used. When you want to use it, extract it from the freezer, put it on the countertop and wait seven minutes while it freezes ice pops quickly and without electricity. The kit includes six durable, reusable, plastic popsicle sticks, as well as drop guards. A perfect solution for healthy, homemade ice cream, yogurt or fruit-based popsicles. On zokuhome.com, you can order a maker for $49.95.

Lauren Kramer, an award-winning writer and editor, lives in Richmond, B.C. To read her work online, visit laurenkramer.net.

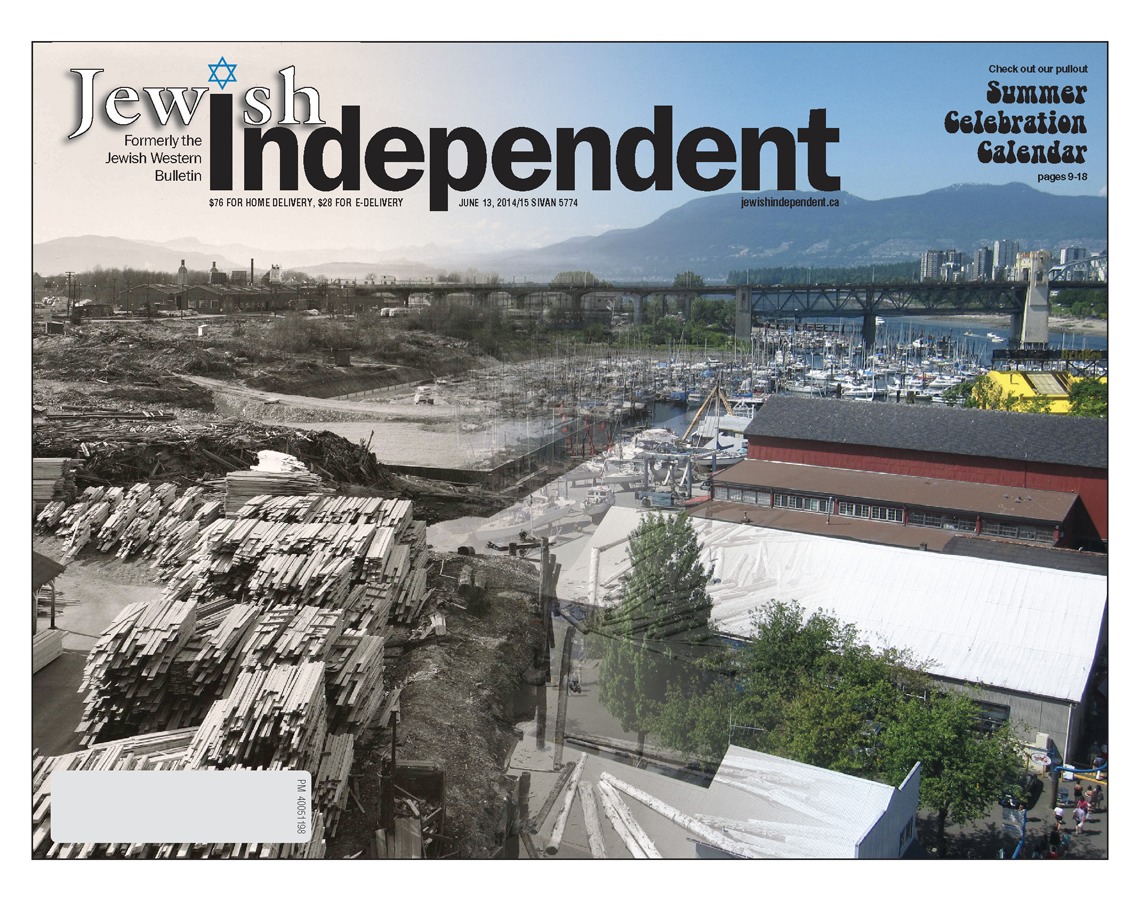
About this year’s Summer Celebration cover

This year’s Summer Celebration cover is a collaborative effort between Jewish Independent production manager Josie Tonio McCarthy, JI publisher Cynthia Ramsay and archivist Jennifer Yuhasz of the Jewish Museum and Archives of British Columbia, which granted the JI permission to use the circa 1950 Leonard Frank photo that appears on the left of the cover and blends into the current-day photo taken on the Granville Street Bridge of False Creek, with the Burrard Bridge and North Shore mountains in background.

Frank was a well-known professional photographer in British Columbia, active between 1910-1944. He was born in Germany and first moved to San Francisco, before traveling to Port Alberni, B.C., to work in the mining industry. He began his photography interest there. In 1916, he moved to Vancouver and began to work as a photographer. He traveled throughout the province, taking a wide array of photographs, thereby preserving a detailed record of life here. Frank was interested in photographing city scenes (buildings, bridges, waterfront), industry (logging, construction, shipping) as well as scenic views (mountains, lakes, woods). In 1946, two years after Frank died, Otto F. Landauer purchased the Leonard Frank Photos Studio, which he owned and operated until his death in 1980.

The JMABC has approximately 39,000 photographs in the Leonard Frank-Otto Landauer Photos Studio collection – the largest collection of Frank photos in existence. Of these, the JMABC has digitized almost 7,000 photographs and made them available for viewing on its website. You can search them using the JMABC’s Yosef Wosk Online Photo Library: jewishmuseum.ca/archives.

To learn how to fade one photo into another in a minute, click here for a video.

Road trip! Explore Chuckanut Drive

There’s immense beauty along Chuckanut Drive whatever time of day you choose to meander those winding roads. (photo by Robert James)

The spring sunshine is warming your car, tempting you with a day drive on an open road that promises breathtaking scenery and interesting stops along the way. Where do you go? Head south, I say. An hour from Vancouver across the Peace Arch border, just as you veer out of Bellingham, there’s a sign for Chuckanut Drive. Take it. You won’t be disappointed.

The scenic byway that connects Whatcom County to Skagit Valley, Chuckanut Drive begins in Bellingham’s historic neighborhood of Fairhaven. From there, it winds along the rocky shoulder of the Chuckanut Mountains, following the shoreline 200 feet above sea level. On its curvaceous route, it offers incredible views of Chuckanut Bay and Samish Bay, the Olympic Mountains, the San Juan Islands and Lummi Island. We’re not just talking about pretty scenery. These are the kind of views that compel you to stop, take out your camera and marvel at the beauty of the Pacific Northwest, delivering “aha!” moments that remind you exactly why you chose to live in this part of the world.

photo - There are continuous canopies of trees shading the bridges on Chuckanut Drive, a lush landscape of forest and mountain.
There are continuous canopies of trees shading the bridges on Chuckanut Drive, a lush landscape of forest and mountain. (photo by Sommer Cronck)

Some drives can get monotonous, but this is not one of them. Chuckanut traverses two very different landscapes. At its northern end, there are mountains, ocean, cliffs, trees, bays and islands. Its southern end takes you through the delta of the Skagit River, past wide, open farmland. It’s a great route for a long, peaceful drive.

The place to begin is in Fairhaven, an historic district filled with galleries, restaurants, bookshops, crafts and artisans. Consider picking up a picnic lunch for the drive at one of the many delis and restaurants in the village, unless you’re planning to eat at a restaurant on Chuckanut Drive.

Once you leave Fairhaven, don your sunglasses, wind down the windows and set your car stereo to your favorite music. If you’re in the mood for a short hike, pull over at Mile 18, the Teddy Bear Cove trailhead, where a wooden staircase takes you down a steep trail to the beach. It’s the unofficial nudist beach, so don’t be surprised if you encounter a bit of bare skin along the way. The beach is a great place for spotting seals and is full of nooks and crannies where you can enjoy a private picnic lunch surrounded by sea gulls, crashing waves and whiffs of salt in the air.

photo - Kayaking in Wildcat Cove provides a close-up view of the life in the beautiful bay.
Kayaking in Wildcat Cove provides a close-up view of the life in the beautiful bay. (photo by Robert James)

An alternative place, one where exposed flesh is much less likely to be seen, is Larrabee State Park, a magnificent, 1,885-acre site along the shores of Samish Bay, with a lush growth of Northwest foliage. A short walk gets you down to Clayton Beach and tidal pools. Bring water shoes and a swimsuit – it’s so beautiful that you might even find the courage to defy the cold Pacific with a quick dip. This is another great place for your picnic lunch, if you’re having one. If not, your next stop could be the Oyster Bar on Chuckanut Drive (theoysterbar.net; 1-360-766-6185), a seafood restaurant with ocean views to die for and cuisine that’s just as inspiring. Much of its fare is local and, in fact, some of the non-kosher variety is grown minutes away at Taylor Shellfish on Samish Bay. However, if seafood isn’t your preference, there are more restaurants along the way.

If you are feeling energetic, there are several trailheads leading to hikes that range from three to six miles long. Regardless, make sure you’ve brought along U.S. dollars, as you might need them when you reach Mile 8, at which point organic produce and farm stands come into view, selling local honey, vegetables, cheese and flowers. Miles seven through one careen past farmland, with a few stores along the way, such as the antique shop, espresso stop and hot dog stand at Mile 3. When you reach Burlington, you’ve come to the exhilarating end of Chuckanut Drive, at which point you may well choose to turn around and do it again the other way. If you’re ready for home, though, take the faster route back to Canada on the Interstate 5 – filling up on gas before you hit the border!

If you go:

• Remember your passport! You cannot cross the U.S.-Canada border without one.

• Check border waits before you go to avoid long lines. On the radio, News 1130 AM delivers the wait times every 10 minutes with its traffic report.

• To get to the exit for the northernmost end of Chuckanut Drive, take #250 off the I-5.

• Pick up a driving guide to Chuckanut from Whatcom County Tourism’s Visitors Centre at 904 Potter St. in Bellingham, call 1-800-487-2032 or visit bellingham.org.

Lauren Kramer, an award-winning writer and editor, lives in Richmond, B.C. To read her work online, visit laurenkramer.net.

Freshen up holiday classics

Cheesecake bars (photo by Mollie Katzen)

Fresh cheese is a staple in classic Shavuot foods, traditionally wrapped in a soft, egg-like blintz that is then fried lightly in butter. Variations on this theme can keep things interesting and expand your kitchen craft. You can try freshening up your blintz package with a cheese upgrade – namely, simple homemade ricotta, which tastes sublime.

Cheesecake is another way to expand the joy of this holiday. Small cheesecake bars, topped with early strawberries, are a wonderful way to usher in the transition-to-summer month of June. A Thai tea cheesecake is beautiful and surprising, rounding out your holiday with a sense of orange expansiveness, and it is actually easier than handcrafting blintzes.

CHEESECAKE BARS

If you love cheesecake, but feel guilty after eating it, pursue it in a small way instead. These bars hit that spot perfectly, especially when adorned with a perfect, small, ripe strawberry.

1/2 cup (packed) light brown sugar
1 1/2 cups unbleached all-purpose flour
1/2 tsp salt
1/2 cup (1 stick) unsalted butter, melted
1 1/2 cups cottage cheese
1/2 cup (half an 8-ounce package) cream cheese, softened
1/3 cup granulated sugar
1 1/2 tsp pure vanilla extract
2 tsp fresh lemon juice
2 large eggs, beaten
handful or two of ripe strawberries (optional)

1. Preheat the oven to 350°F (325°F if using a glass pan). Have ready a six-by-nine-inch baking pan (ungreased) or the equivalent.

2. In a medium sized bowl, combine the flour with 1/4 teaspoon of the salt and the brown sugar, crumbling the sugar into the flour with your hands until uniformly distributed. Add the melted butter and stir to thoroughly combine. Press this mixture firmly into the bottom of the pan.

3. Combine the cottage cheese, cream cheese, granulated sugar, vanilla, lemon juice and eggs in the bowl of a food processor and buzz until completely smooth. Pour this mixture into the pan, spreading it into place.

4. Bake in the centre of the oven for 30 minutes, or until the top surface is firm to the touch. Remove from the oven, and allow it to cool completely before chilling. Let it chill for at least two hours and serve cold, cut into 1.5-inch squares; ideally, topped with sliced strawberries.

Makes about 1.5 dozen.

HOMEMADE RICOTTA

Homemade ricotta is not only more soulful than anything you can buy, but also more economical, producing approximately one pound of cheese for the price of a half-gallon of milk. You can determine the thickness of the cheese by keeping watch over the project and wrapping it up (in every sense) when the cheese achieves your preferred texture. The longer it stands, the firmer it becomes. Time and gravity – and your taste – are the textural determinants. You also get to decide on the salt content. Try this for dessert or brunch, with some artisan honey warmed and spooned over the top like a syrup, and possibly also some fresh fruit, toasted nuts and scones or little cookies. You can get cheesecloth in most grocery stores.

1/2 gallon whole milk
1 cup whole milk yogurt
1/2 cup fresh lemon juice
1/2 tsp salt (or to taste)

1. Combine the milk and yogurt in a large saucepan or a kettle and whisk until smooth. Place over medium heat and warm for about 15 minutes, or until tiny bubbles form along the sides. The top surface may bulge slightly and a little skin might develop. All normal.

2. Remove the pan from the stove and pour in the lemon juice without mixing. Let the mixture stand at room temperature for an hour to curdle.

3. Prepare a four-layer cheesecloth net about 16 to 18 inches square. Lay this inside a medium-large fine mesh strainer or colander balanced over a bowl. Long pieces of cheesecloth will drape down the sides. Pour the curdled mixture into the net so the liquid drips into the bowl and the solids remain in the cheesecloth. Don’t press it or try to hurry the process along in any way, or you’ll lose some of the cheese. The whey needs to drip at its own pace.

4. After about an hour, lift the side-flaps of cheesecloth and, without actually knotting them, tie them neatly around the cheese. Let it stand, slowly dripping, for another two hours, or even longer, if you like a firmer, drier cheese.

5. Salt the cheese to taste, transfer it to a tightly covered container, and refrigerate. It will keep for about five days.

THAI TEA CHEESECAKE

photo - Thai tea cheesecake
Thai tea cheesecake. (photo by Mollie Katzen)

From The Heart of the Plate: Vegetarian Recipes for a New Generation. Thai iced tea morphs into a dessert (it didn’t have far to go), and all I can say is, this is kind of amazing. No baking required, just a patted-into-place crumb crust and a stovetop-thickened filling. Cool to room temperature, then chill and/or (in my perfect world) freeze.

Brew and strain the tea well ahead of time. To get the proper strength for this recipe, steep 1/2 cup Thai tea in 2 1/2 cups boiling water for 10 minutes, then strain, pressing out and saving as much of the water as you can.

Chocolate crumb crust:

6 to 7 ounces graham crackers (10 or 11 long ones)
1/4 cup unsweetened cocoa powder
1 tbsp sugar
1/2 cup (1 stick) unsalted butter, melted

1. Place the graham crackers in a food processor and buzz to fine crumbs. You should have about two cups.

2. Transfer the crumbs to a bowl, stir in the cocoa and sugar, and pour in the melted butter. Mix to thoroughly combine and then transfer to a nine-inch pie pan.

3. Spread it out to cover the bottom completely and evenly, letting it begin to climb up the sides of the pan. Pat it into place, gently at first and then firmly, turning the pan as you go, and building a nice edge flush with the rim. Set aside.

Filling:

1/2 cup sugar
3 tbsp cornstarch
1/4 tsp salt
2 large eggs
1 1/2 cups strong-brewed Thai tea, strained and cooled
1 tsp pure vanilla extract
8 ounces cream cheese

1. In a medium saucepan, whisk together the sugar, eggs and cornstarch until smooth. Stir in the tea and vanilla.

2. Bring to a boil over medium heat, whisking frequently. Cook and stir for five to eight minutes, or until the custard thickens to the point where it starts to resist being stirred.

3. Remove from the heat and immediately add the cream cheese in pieces; it will melt in. Whisk exuberantly until the cream cheese is completely incorporated and the mixture becomes uniform. This will likely take several minutes.

4. Pour the hot mixture directly into the crust and let it cool to room temperature, then cover with plastic wrap and refrigerate until cold. Make the topping in the meantime.

Topping:

2/3 cups sour cream
2 tbsp brewed Thai tea (optional)
1 tbsp sugar
1/2 tsp pure vanilla extract
pinch of salt

1. Whisk together all the ingredients until smooth and uniform.

2. Spoon on to the top of the pie, spreading it to the edges of the crust.

3. Carefully (so as not to disturb the top surface) cover with plastic wrap and refrigerate or freeze until serving time. Serve at any temperature, from very cold to partially (or even mostly) frozen.

Yields eight or more servings.

With more than six million books in print, Mollie Katzen is listed by the New York Times as one of the bestselling cookbook authors of all time and has been named by Health Magazine as one of “The Five Women Who Changed the Way We Eat.” Her new book, The Heart of the Plate: Vegetarian Recipes for a New Generation, was published in September 2013 by Houghton Mifflin Harcourt.

Mystery photo … May 30/14

Branch #1, Jewish war veterans, Vancouver, B.C., 1976. (JWB fonds, JMABC L.146244)

If you know someone in this photo, please help the JI fill the gaps of its predecessor’s (the Jewish Western Bulletin’s) collection at the Jewish Museum and Archives of B.C. by contacting archives@jewishmuseum.ca.

Plan your giving in Leave a Legacy Month

If you don’t have a will, get it done. That’s the message of the Canadian Association of Gift Planners, an organization that’s designated the month of May as Leave a Legacy Month. Calvin Fong, chair of the national program titled Leave a Legacy, said the program’s goal is to raise awareness of the importance of having a will, as well as the idea that people consider leaving a gift to charity in their will.

“If you die without a will you really have no control over how your estate gets distributed – legislation will dictate that instead,” Fong told the Independent. “Without a will, for example, you have no way of leaving a gift to your favorite charity or creating a trust for your spouse. Having a will ensures your wishes are articulated and carried out after your death.”

Just six weeks ago there were changes to the Wills, Estates and Succession Act (WESA) with important implications. The minimum age to create a will has been lowered from 19 to 16, wills created prior to marriage are still valid after marriage, and the courts have been granted authority to recognize non-compliant documents as wills, and ensure that a deceased person’s last wishes will be respected. For example, legislation now allows for the possibility that electronic versions of wills might be recognized. “The changes modernize legislation created over 100 years ago and streamlines things for the public,” Fong explained.

Tax savings is another reason to consider creating a will. Gifting money or assets to charity makes your estate eligible for a tax deduction upon your death, while creating a trust in your estate allows you to defer taxation of certain assets.

If considering gifting money to charity, start by figuring out what you want your personal legacy to be, advised Marcie Flom, director of the Jewish Community Foundation, which is housed at the Jewish Federation of Greater Vancouver. JCF works one-on-one with donors to create their legacies, using bequests, gifts of life insurance, gifts of cash and in-kind donations, annuities and charitable trusts. To date, it has 330 endowment funds and assets of $42 million that it manages on behalf of donors in the community.

With gifts of life insurance, donors name JCF as the owner and beneficiary. Upon their death, the proceeds of the policy enter an endowment fund they created during their lifetime, supporting causes that were important to them. “Some donors have various life insurance policies and discover that they no longer need them, so they decide to donate them to the foundation,” Flom explained.

With bequests, individuals stipulate a gift to the foundation in their will to support those causes. “It can take various forms, such as a set amount or a percentage of their estate,” Flom said. “It’s very personal, and usually people meet with me to talk about what they want to do, the idea being that we want to help increase your current income or estate value, while also creating a lasting legacy for the community.”

That legacy can involve donations to Jewish and non-Jewish causes, as the JCF distributes funds to both. And there’s a broad range of donors, Flom said, with some funds established with as little as $1,000, or no assets at all if it’s a planned gift. “Some donors make a modest contribution to their fund each year to build it over time,” she explained, “but legacy planning is not limited to those with means. Anyone can establish a fund in any amount and build it over time or establish a fund with a planned future gift.”

Some individuals use their legacy to involve and engage their children in active philanthropy. “They work with us on their philanthropy during their lives, but also use it as a method to engage their kids to take over that philanthropy after they’re gone,” Flom said. The children continue their parents’ legacy of lifetime giving by working together to direct support to their parents’ favorite charities and/or the charities that they are passionate about.

For more information, call the Jewish Community Foundation at 604-257-5100 or visit jewishcommunityfoundation.com. For more on Leave a Legacy Month, WESA changes and more, visit leavealegacy.ca or cra-arc.gc.ca.

Lauren Kramer, an award-winning writer and editor, lives in Richmond, B.C. To read her work online, visit laurenkramer.net.

Inclusive and accessible playgrounds

Equipment like the Roller Table can help children develop their upper body muscles. (photo by Deborah Rubin Fields)

Not all playground equipment is created equal. Some equipment is accessible while some is not. Certain equipment is accessible to young wheelchair users, yet cannot be labeled inclusive play apparatus. However, some playground items are both accessible and inclusive and, notably, provide wheelchair-bound children with opportunities for either muscle toning and/or creative play.

Landscape Structures has designed a number of accessible and inclusive pieces of playground equipment. Take, for example, the new ZipKrooz. This is a scaled-down version of the popular adult zip line. The young passenger sits in a hard, high-back seat, secured with a harness. For safety, the chair runs fairly close to the ground. Gravity propels the child across the line. Close to the end of the line, the chair rocks back toward the centre before coming to a stop. The launching action is repeated, as many times as desired. A child using a wheelchair might need help from a grown escort to assist with the transfer to and from the wheelchair to the zip seat, to position the child at the beginning of the line, and to gently push the back of the chair to launch the occupant.

The Play Booster Sway Fun Glider is a roomy, communal “landed” boat that artificially creates wave motion. The “sailors” can either rock the boat from their seated positions or assistants can stand outside the bow or stern, swaying the boat. Wheelchair access is provided via a pull-down ramp. Sitting around a bolted-down table, two wheelchair-using youngsters may join in imagery play with other passengers. Wheelchairs are apparently not locked down; instead, wheelchair users either stabilize themselves with their chair’s brakes and with the table’s hand holds or have their attendants sit behind them, holding the chair’s back hand grips.

The next three play lot items not only promote inclusion and accessibility, but also muscle strengthening. The Accessible Stationary Cycler, the Accessible Power Lifter chinning bar and the Roller Table, for example, help children develop the muscles in their upper body – in their arms, upper back, neck and/or chest. Each apparatus is built low enough so that children using wheelchair mobility (and who have use of their arms and hands) can either reach up to raise themselves out of their chairs or sit in their chairs to comfortably play.

The following two pieces of equipment provide for inclusion and accessibility while focusing on creative enterprise.

Landscape Structures manufactures what it calls an Elevated Sand Table. This raised sandbox allows juvenile wheelchair users (who have use of their arms and hands) to build sandcastles from their chairs. From a standing position, children without physical disabilities play alongside.

The Chimes Reach Panel lets wheelchair users and non-physically challenged children to literally play harmoniously. They may make music together by ringing a row of chimes.

On the other side of the accessibility spectrum (and geographically on the other side of the world), there is the Australian-made Liberty Swing. With its design to accommodate most wheelchairs, this swing is apparently a big hit in Australia, yet this equipment sometimes stands off to the side of the other playground equipment, fenced off and under lock and key.

Admittedly, vandalism and theft are problems playground officials face worldwide. But this reality means that while the swing is accessible to children who use wheelchair mobility, it is not necessarily mainstream integrated.

Play is necessary for a child’s physical and mental development. In the Western world, playing with one’s peers, regardless of one’s physical or mental ability, has been deemed a child’s right. Overall, the surveyed play items show significant progress has been made in fulfilling this objective. Physical and occupational therapists who work with children would do well to encourage their young clients and their families to make use of such equipment, and to try and make playgrounds everywhere as accessible and inclusive as possible.

Deborah Rubin Fields is an Israel-based features writer. She is also the author of Take a Peek Inside: A Child’s Guide to Radiology Exams, published in English, Hebrew and Arabic (take-a-peek-inside.com).